Add ETH Address to MetaMask: A Comprehensive Guide
Adding an Ethereum address to your MetaMask wallet is a crucial step for anyone looking to interact with the Ethereum blockchain. Whether you’re a beginner or a seasoned crypto enthusiast, understanding how to add an address to your MetaMask wallet can open up a world of possibilities. In this detailed guide, I’ll walk you through the process step by step, ensuring you have a seamless experience.
Understanding MetaMask
Before diving into the process of adding an Ethereum address to your MetaMask wallet, it’s important to have a basic understanding of what MetaMask is and how it works.

MetaMask is a popular cryptocurrency wallet that allows users to store, manage, and interact with Ethereum-based applications. It acts as a bridge between the Ethereum blockchain and the user, enabling transactions, smart contract interactions, and more.
Setting Up MetaMask
Before you can add an Ethereum address to your MetaMask wallet, you need to set up the wallet itself. Here’s how to do it:
- Visit the MetaMask website (metamask.io) and click on the “Get MetaMask” button.
- Select the option that suits you best: either download the Chrome extension, Firefox add-on, or mobile app.
- Follow the on-screen instructions to install the wallet.
- Once installed, open the wallet and click on the “Create a new wallet” button.
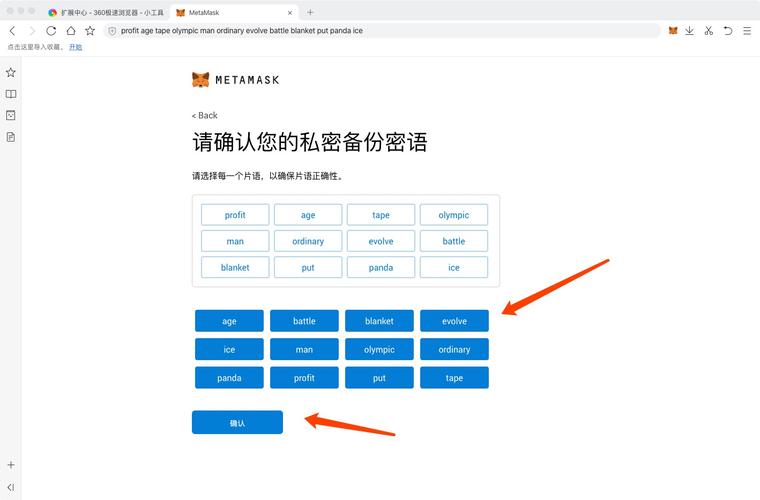
- Set a strong password for your wallet and write down your seed phrase. This phrase is crucial for recovering your wallet in case you lose access to it.
- Click “I’ve written down my seed phrase” to proceed.
- Now, you can start using your MetaMask wallet to interact with the Ethereum blockchain.
Adding an Ethereum Address to MetaMask
Now that you have your MetaMask wallet set up, it’s time to add an Ethereum address. Here’s how to do it:
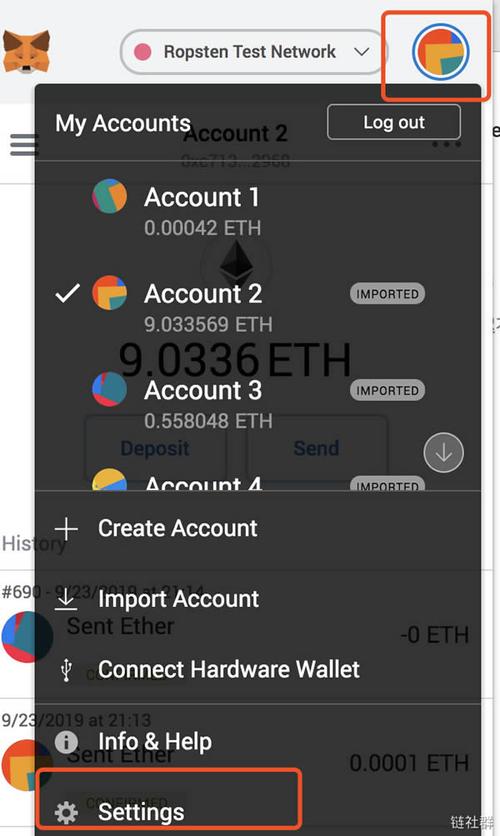
- Open your MetaMask wallet and click on the “Accounts” tab.
- Click on the “Import Account” button.
- Select “Import from private key” or “Import from seed phrase” depending on your preference.
- Enter the private key or seed phrase for the Ethereum address you want to add.
- Click “Import” to add the address to your wallet.
- Once the address is added, you’ll see it listed under the “Accounts” tab.
Verifying the Address
After adding an Ethereum address to your MetaMask wallet, it’s important to verify that the address is correct. Here’s how to do it:

- Copy the address from your MetaMask wallet.
- Visit an Ethereum address lookup website, such as Etherscan (etherscan.io).
- Paste the address into the search bar and click “Search” or “Enter” on your keyboard.
- The website will display information about the address, including its balance, transaction history, and more.
- Compare the information on the address lookup website with the details of the address in your MetaMask wallet to ensure they match.
Using the Address
Once you’ve added and verified an Ethereum address to your MetaMask wallet, you can start using it to interact with the Ethereum blockchain. Here are some common use cases:
- Send and receive ETH: Use the address to send ETH to other users or receive ETH from them.
- Interact with decentralized applications (dApps): Use the address to log in to and interact with dApps built on the Ethereum blockchain.
- Participate in token sales: Use the address to participate in token sales and purchase new tokens.
- Stake ETH: Use the address to stake your ETH and earn rewards.
Conclusion
Adding an Ethereum address to your MetaMask wallet is a straightforward process that can be completed in just a few steps. By following this guide, you can ensure that your wallet is set up correctly and that you can start interacting with the Ethereum blockchain with ease.
Remember to keep your wallet secure by setting a strong password, writing down your seed phrase, and never sharing your private key with anyone. Happy Ethereum-ing!


