Arduino ETH Shield 2: A Comprehensive Guide
The Arduino ETH Shield 2 is a versatile expansion board designed for Arduino Uno, Mega, and other compatible boards. It allows you to connect your Arduino to a local area network (LAN) using an Ethernet cable. In this article, we will delve into the various aspects of the Arduino ETH Shield 2, including its features, installation, usage, and troubleshooting.
Features of the Arduino ETH Shield 2
The Arduino ETH Shield 2 comes with a range of features that make it an excellent choice for networking projects. Here are some of its key features:
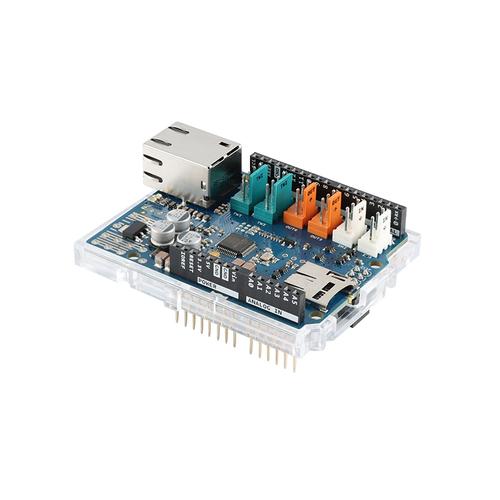
- Ethernet Connectivity: The shield features a built-in Ethernet module that supports 10/100 Mbps Ethernet connectivity.
- SD Card Support: It has an SD card slot that allows you to store and read data from an SD card, which can be useful for logging data or storing files.
- Power Supply: The shield can be powered via the Arduino board or an external power supply, providing flexibility in your project setup.
- LED Indicators: It includes LED indicators for power, activity, and link status, making it easy to monitor the shield’s status.
- Arduino Compatibility: The shield is compatible with Arduino Uno, Mega, and other compatible boards, making it a versatile choice for various projects.
Installation of the Arduino ETH Shield 2
Installing the Arduino ETH Shield 2 is a straightforward process. Here’s a step-by-step guide to help you get started:
- Remove the Arduino board from your Arduino Uno or Mega.
- Align the ETH Shield 2 with the Arduino board and gently press it down until it clicks into place.
- Connect the Arduino board to your computer using a USB cable.
- Install the Arduino IDE if you haven’t already.
- Upload a sketch to your Arduino board to ensure that it is working correctly.
Once the installation is complete, you can proceed to connect the shield to your network.
Connecting the Arduino ETH Shield 2 to a Network
Connecting the Arduino ETH Shield 2 to a network involves a few simple steps:
- Connect an Ethernet cable from the shield to your router or switch.
- Connect the other end of the Ethernet cable to your router or switch.
- Power on the Arduino board and wait for the LED indicators to light up.
- Open the Arduino IDE and upload a sketch that allows your Arduino to connect to the network.
Once the sketch is uploaded, your Arduino should be connected to the network, and you can start sending and receiving data.
Using the Arduino ETH Shield 2
The Arduino ETH Shield 2 can be used for a variety of networking projects. Here are some examples:
- Web Server: You can use the shield to create a web server that can be accessed from any device connected to the same network.
- Network Monitoring: The shield can be used to monitor network traffic and detect anomalies.
- Data Logging: You can use the SD card slot to store data collected from sensors or other devices.
- Remote Control: The shield can be used to control devices over the network, such as turning on or off lights or appliances.
Troubleshooting the Arduino ETH Shield 2
Like any electronic device, the Arduino ETH Shield 2 may encounter issues from time to time. Here are some common problems and their solutions:
- No Power: Ensure that the shield is properly connected to the Arduino board and that the power supply is functioning correctly.
- No Network Connection: Check the Ethernet cable connections and ensure that the shield is connected to a working network.
- SD Card Not Working: Make sure that the SD card is properly inserted and formatted. Try using a different SD card to rule out any issues with the card itself.
By following these troubleshooting steps, you should be able to resolve most issues with the Arduino ETH Shield 2.
Conclusion
The Arduino ETH Shield


