
Add ETH in Metamask: A Comprehensive Guide
Adding Ethereum (ETH) to your MetaMask wallet is a crucial step if you’re looking to interact with the Ethereum blockchain. Whether you’re a beginner or an experienced crypto user, this guide will walk you through the process in detail. Let’s dive in!
Understanding MetaMask
MetaMask is a popular cryptocurrency wallet that allows users to store, send, and receive Ethereum and other ERC-20 tokens. It’s a browser extension that integrates with various web3 applications, making it easy to interact with decentralized applications (dApps) on the Ethereum network.

Setting Up MetaMask
Before you can add ETH to your MetaMask wallet, you need to set it up. Here’s how to do it:
- Go to MetaMask’s website and download the extension for your preferred browser.
- Open the extension and click on “Create a new wallet” to start the setup process.
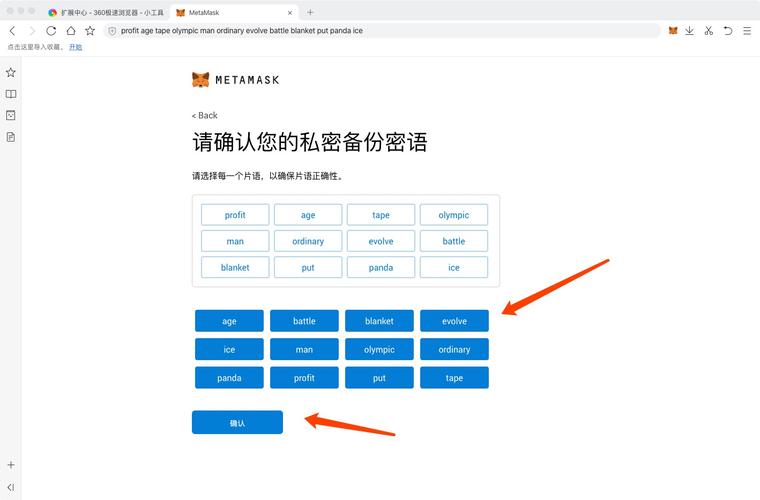
- Follow the on-screen instructions to create a strong password and write down your seed phrase. This phrase is crucial for recovering your wallet if you lose access to it.
- Once your wallet is set up, you’ll see your Ethereum address. This is the address you’ll use to receive ETH and other tokens.
Adding ETH to MetaMask
Now that you have MetaMask set up, let’s add ETH to your wallet:
- Open your MetaMask wallet and click on the “Ethereum Mainnet” network. If you’re using a different network, make sure to switch to Ethereum Mainnet.
- Click on the “Receive” button to see your Ethereum address. This is the address you’ll use to receive ETH.
- Copy your Ethereum address and paste it into the “Recipient” field of the Ethereum wallet or exchange you’re sending ETH from.
- Enter the amount of ETH you want to send. Make sure to double-check the amount to avoid sending too much or too little.
- Review the transaction details and click “Send” to confirm the transaction.
Verifying the Transaction
After you’ve sent ETH to your MetaMask wallet, you’ll need to wait for the transaction to be confirmed on the Ethereum network. Here’s how to verify the transaction:
- Go to Etherscan and paste your Ethereum address into the search bar.
- Look for the latest transaction that shows the amount of ETH you sent. The transaction should have a “Success” status.
- Wait for the transaction to be confirmed. This process can take anywhere from a few minutes to several hours, depending on the network congestion.
Using ETH in MetaMask
Once the ETH has been added to your MetaMask wallet, you can use it to interact with dApps, send tokens, or even participate in staking. Here’s a brief overview of some common uses:
- Interacting with dApps: Open the dApp you want to use and connect your MetaMask wallet. You’ll be able to access the dApp’s features and perform transactions using your ETH.
- Sending tokens: Open your MetaMask wallet, click on the token you want to send, and follow the same steps as you would for sending ETH.
- Participating in staking: Some dApps and protocols allow you to stake your ETH for rewards. Check the dApp’s documentation for instructions on how to stake your ETH.
Security Tips
While using MetaMask and ETH, it’s important to keep your wallet and private keys secure. Here are some tips to help you stay safe:
- Keep your seed phrase safe: Never share your seed phrase with anyone. If someone has access to your seed phrase, they can control your wallet and your ETH.
- Use a strong password: Your MetaMask password should be strong and unique. Avoid using common words or phrases.
- Keep your browser extension updated: Regularly update your MetaMask extension to ensure you have the latest security features.


")
