
Add ETH Token to Metamask: A Comprehensive Guide
Adding Ethereum tokens to your Metamask wallet is a crucial step for anyone looking to engage with the decentralized finance (DeFi) ecosystem or simply hold digital assets. In this detailed guide, I’ll walk you through the process step by step, ensuring you have a seamless experience.
Understanding Metamask and Ethereum Tokens
Before diving into the specifics of adding tokens, it’s important to understand what Metamask is and what Ethereum tokens represent.

Metamask is a popular Ethereum wallet that allows users to store, send, and receive Ethereum and other ERC-20 tokens. It’s a browser extension that integrates with your web browser, making it easy to interact with decentralized applications (dApps) and smart contracts.
Ethereum tokens are digital assets built on the Ethereum blockchain. They can represent a variety of things, from utility tokens that give you access to a service to security tokens that represent ownership in a company.
Setting Up Metamask
Before you can add tokens to Metamask, you need to have the wallet set up. Here’s how to do it:
- Go to Metamask’s website and download the extension for your browser.
- Follow the installation instructions for your specific browser.
- Once installed, open Metamask and click “Create a new wallet.” Choose a strong password and write down your seed phrase. This phrase is crucial for recovering your wallet if you lose access to it.
- Connect your wallet to an Ethereum node by clicking “Import Account.” You can choose to connect to a public node or use Infura or Alchemy for a more seamless experience.
Finding the Token Address
Once you have Metamask set up, you need to find the address of the token you want to add. Here’s how to do it:
- Search for the token on a platform like CoinMarketCap or CoinGecko.
- Look for the token’s contract address. This is a unique string of characters that identifies the token on the Ethereum blockchain.
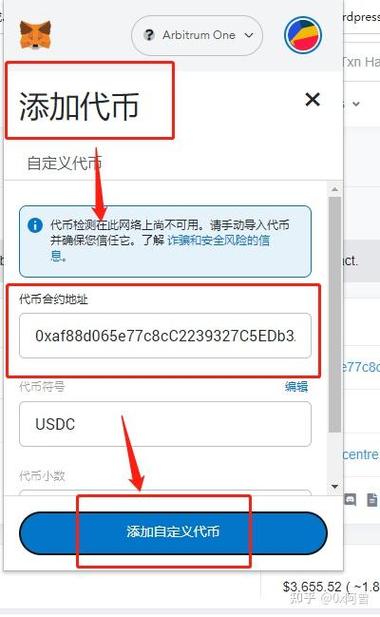
Adding the Token to Metamask
Now that you have the token address, you can add it to your Metamask wallet:
- Open Metamask and click on the token icon in the upper right corner.
- Select “Add Token” and then “Custom Token.”
- Paste the token address into the “Contract Address” field.
- Enter the token’s symbol and name. You can find this information on the token’s website or whitepaper.
- Select the token’s decimal places. This represents the number of digits after the decimal point in the token’s value.
- Click “Add Token” and the token should now appear in your wallet.
Verifying the Token
After adding the token, it’s important to verify that it’s the correct token. Here’s how to do it:
- Go to Etherscan and paste the token address into the search bar.
- Check that the token’s name, symbol, and total supply match what you entered in Metamask.
- Look for the token’s logo and ensure it matches the one you see in Metamask.
Using the Token
Once you’ve added and verified the token, you can use it to interact with dApps, send it to friends, or simply hold it in your wallet.
When using the token in a dApp, make sure you’re sending the correct amount. You can do this by checking the token’s balance in Metamask and using the dApp’s interface to send the appropriate amount.
Conclusion
Adding Ethereum tokens to Metamask is a straightforward process that can be completed in a few simple steps. By following this guide, you can ensure that you have the tokens you need to participate in the Ethereum ecosystem.
Remember to always verify


