
Arduino ETH Shield: A Comprehensive Guide for Aspiring Makers
The Arduino ETH Shield is a popular accessory for Arduino enthusiasts and professionals alike. It allows you to connect your Arduino board to a local area network (LAN) or the internet, enabling you to control and communicate with your Arduino projects remotely. In this article, we will delve into the details of the Arduino ETH Shield, covering its features, installation, usage, and troubleshooting tips.
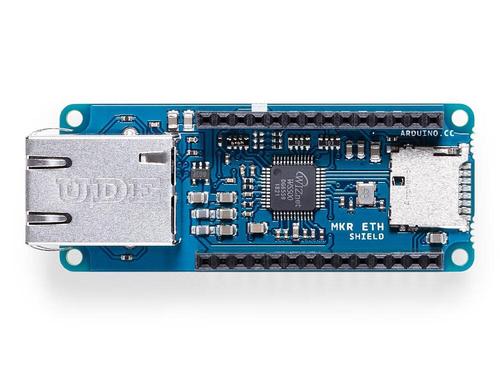
Understanding the Arduino ETH Shield
The Arduino ETH Shield is designed to work with Arduino Uno, Mega, and other compatible boards. It features an Ethernet port, which allows you to connect your Arduino to a router or switch using an Ethernet cable. The shield also includes an integrated microSD card slot, which can be used to store data or run sketches directly from the card.

| Component | Description |
|---|---|
| Ethernet Port | Used to connect the Arduino to a router or switch using an Ethernet cable. |
| MicroSD Card Slot | Enables you to store data or run sketches directly from the microSD card. |
| W5100 Ethernet Module | Handles the communication between the Arduino and the Ethernet network. |
One of the key features of the Arduino ETH Shield is its compatibility with the Arduino Ethernet library. This library provides a set of functions that allow you to easily send and receive data over the Ethernet network. You can use these functions to read sensor data, send data to a server, or control other devices connected to the network.
Installing the Arduino ETH Shield
Installing the Arduino ETH Shield is a straightforward process. Here’s a step-by-step guide to help you get started:
- Remove the existing shield from your Arduino board, if any.
- Align the Arduino ETH Shield with the mounting holes on your Arduino board.
- Screw the shield into place using the provided screws and nuts.
- Connect an Ethernet cable to the shield’s Ethernet port and plug the other end into your router or switch.
- Insert a microSD card into the shield’s microSD card slot, if needed.
Once the shield is installed, you can upload your sketches to the Arduino board as you would with any other shield. Make sure to include the Arduino Ethernet library in your sketch to take advantage of the shield’s networking capabilities.
Using the Arduino ETH Shield
With the Arduino ETH Shield installed and your sketch uploaded, you can start using it to communicate with your Arduino over the network. Here are some common use cases:
-
Reading sensor data from a remote location and sending it to a server for analysis.
-
Controlling a device connected to the Arduino over the network, such as a relay module or a motor driver.
-
Receiving data from a server and using it to control the Arduino, such as adjusting the speed of a motor based on a received value.
Here’s an example of a simple sketch that reads data from a temperature sensor connected to the Arduino and sends it to a server using the Arduino Ethernet library:
include <SPI.h>include <Ethernet.h>byte mac[] = { 0xDE, 0xAD, 0xBE, 0xEF, 0xFE, 0xED };byte ip[] = { 192, 168, 1, 100 };byte gateway[] = { 192, 168, 1, 1 };byte subnet[] = { 255, 255, 255, 0 };EthernetClient client;void setup() { Serial.begin(9600); Ethernet.begin(mac, ip, gateway, subnet);}void loop() { if (client.connect("192.168.1.50", 80)) { client.println("GET /temperature HTTP/1.1"); client.println("Host: 192.168.1.50"); client.println("Connection: close"); client.println(); } if (client.available()) { String line = client.readStringUntil(''); Serial.println(line); } delay(1000);}
In this example


")