
Asrock H110 Pro BTC+ BIOS Settings for GPU ETH Mining: A Comprehensive Guide
Are you looking to optimize your Asrock H110 Pro BTC+ motherboard for Ethereum mining with GPUs? You’ve come to the right place. In this detailed guide, we’ll delve into the BIOS settings that can help you maximize your mining performance. Whether you’re a beginner or an experienced miner, this article will provide you with the knowledge you need to tweak your BIOS for optimal GPU ETH mining.
Understanding the Asrock H110 Pro BTC+ Motherboard
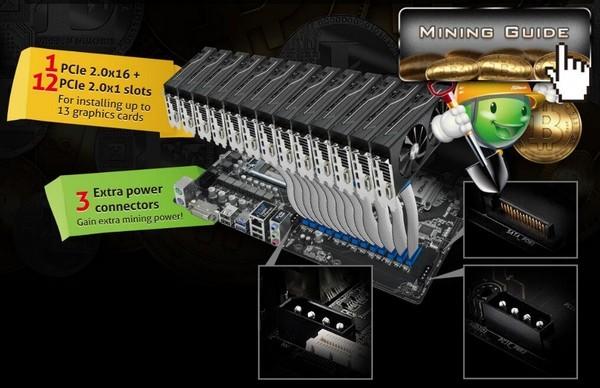
The Asrock H110 Pro BTC+ is a mining-specific motherboard designed for Ethereum mining with GPUs. It features a robust power design, multiple PCIe slots, and a dedicated BIOS for mining. Before diving into the BIOS settings, it’s essential to understand the key components of the motherboard and their roles in mining.

| Component | Description |
|---|---|
| Power Design | High-quality power components ensure stable power delivery to the GPUs, minimizing the risk of overheating and failure. |
| PCIe Slots | Multiple PCIe slots allow you to connect multiple GPUs for enhanced mining performance. |
| Dedicated BIOS | The mining-specific BIOS provides optimized settings for Ethereum mining with GPUs. |
Now that you have a basic understanding of the Asrock H110 Pro BTC+, let’s move on to the BIOS settings that can help you maximize your mining performance.
Entering the BIOS
Before you can start tweaking your BIOS settings, you need to enter the BIOS setup. To do this, follow these steps:
- Power on your computer and press the appropriate key to enter the BIOS. This key may vary depending on your motherboard manufacturer, but common keys include F2, Del, or Esc.
- Use the arrow keys to navigate to the “Advanced” tab.
- Select “Advanced CPU Features” and press Enter.
- Look for the “CPU Ratio Control” option and set it to “Manual.” This will allow you to adjust the CPU multiplier for better mining performance.
- Press F10 to save your changes and exit the BIOS.
Now that you’ve entered the BIOS, let’s dive into the key settings that can help you optimize your Asrock H110 Pro BTC+ for GPU ETH mining.
Optimizing CPU Settings
Optimizing your CPU settings can significantly improve your mining performance. Here are some essential CPU settings to adjust:
- CPU Ratio Control: Set this to “Manual” and adjust the CPU multiplier to a higher value. This will increase the CPU’s clock speed, which can lead to better mining performance. However, be cautious not to exceed the CPU’s maximum safe operating temperature (TjMax) to avoid overheating.
- CPU Vcore: Increase the CPU voltage to provide more power to the CPU. This can help stabilize the CPU clock speed and improve performance. However, be cautious not to exceed the CPU’s maximum voltage to avoid damage.
- CPU Load Line Calibration: Set this to “Max Performance” to ensure the CPU voltage is stable under load.
Here’s a table summarizing the recommended CPU settings for Asrock H110 Pro BTC+:
| Setting | Recommended Value |
|---|---|
| CPU Ratio Control | Manual |
| CPU Vcore | 1.35V – 1.4V (depending on your CPU and cooling solution) |
| CPU Load Line Calibration | Max Performance |
Optimizing Memory Settings
Optimizing your memory settings can also help improve your mining performance. Here are some essential memory settings to adjust:
- Memory Frequency: Lower the


")