
Add ETH Token: A Comprehensive Guide
Adding Ethereum tokens to your wallet can be a daunting task, especially if you’re new to the world of cryptocurrencies. However, with the right guidance, it can be a straightforward and rewarding process. In this article, we’ll walk you through the steps to add an Ethereum token to your wallet, covering various aspects such as choosing the right wallet, finding the token, and understanding the process.
Choosing the Right Wallet
Your wallet is the gateway to your Ethereum tokens, so it’s crucial to choose the right one. There are several types of wallets available, each with its own set of features and security levels. Here’s a brief overview of the most popular wallet types:

| Wallet Type | Description |
|---|---|
| Exchanges | Exchanges like Coinbase and Binance offer wallets that are easy to use but may not be the most secure for long-term storage. |
| Mobile Wallets | Mobile wallets like Trust Wallet and MetaMask are convenient for everyday transactions but may not be suitable for large amounts of tokens. |
| Desktop Wallets | Desktop wallets like MyEtherWallet and Exodus provide more control and security but require you to manage your private keys. |
| Hardware wallets like Ledger Nano S and Trezor are the most secure option for storing large amounts of tokens, but they are also the most expensive. |
When choosing a wallet, consider the following factors:
- Security: Ensure the wallet has strong security features, such as two-factor authentication and biometric verification.
- Usability: Choose a wallet that is easy to use and navigate, especially if you’re new to the world of cryptocurrencies.
- Support: Look for a wallet with good customer support, as you may encounter issues during the token addition process.
Finding the Token
Once you’ve chosen a wallet, the next step is to find the Ethereum token you want to add. Here’s how to do it:
- Search for the token’s name or ticker symbol on your chosen wallet’s interface.
- Ensure the token is listed on a reputable exchange or platform, such as Uniswap or Binance.
- Check the token’s contract address to verify its authenticity. You can do this by searching for the address on Etherscan or another blockchain explorer.
When searching for the token, be cautious of scams and fake tokens. Always double-check the token’s contract address and ensure it matches the one listed on the exchange or platform.
Adding the Token to Your Wallet
Once you’ve found the token, follow these steps to add it to your wallet:
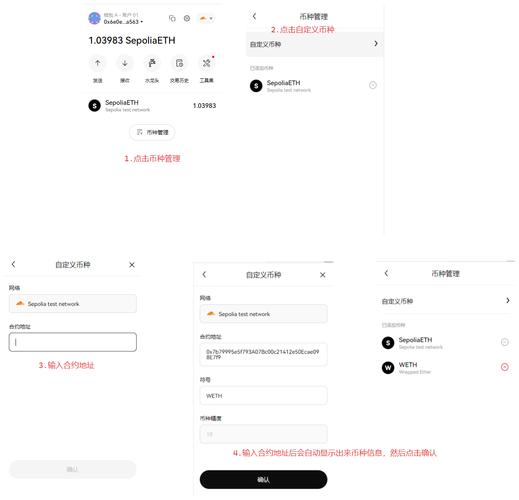
- Open your wallet and navigate to the “Add Token” or “Import Token” section.
- Enter the token’s contract address in the provided field.
- Select the token’s symbol and name from the dropdown menu.
- Click “Add Token” or “Import Token” to add the token to your wallet.
After adding the token, you should see it listed in your wallet’s token list. You can now send, receive, and trade the token using your wallet.
Understanding the Token’s Transaction Fees
When adding an Ethereum token to your wallet, it’s essential to understand the transaction fees involved. These fees are paid to miners for processing your transaction on the Ethereum network. Here’s what you need to know:
- Gas Price: The gas price is the amount of Ether you’re willing to pay per unit of gas. A higher gas price increases the likelihood of your transaction being processed quickly but also increases the overall transaction fee.
- Gas Limit: The gas limit is the maximum amount of gas your transaction can consume. A higher gas limit increases the likelihood of your transaction being processed but also increases the overall transaction fee.
When adding a token to your wallet, you may need to pay a small transaction fee to add the token to the network. This fee is typically around 0


")
